Custom Reply Mail Management Setup Using Sender Profiles in Salesforce Marketing Cloud
- Marta Pinto

- Dec 23, 2024
- 2 min read
Do you want to ensure your ✉️ emails get professional replies? Salesforce Marketing Cloud (SFMC) helps you manage 📥 email replies efficiently with Custom Reply Mail Management (RMM). Let’s break down how to set it up step by step. 🛠️
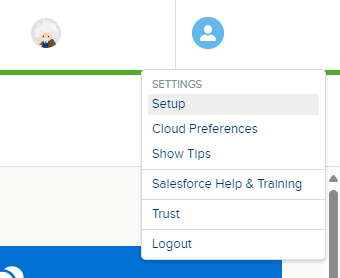
Step 1: Setting Up a Sender Profile in Salesforce Marketing Cloud
Open Sender Profiles
Log in and go to ⚙️ Setup from your user menu.
Navigate to 📂 Platform Tools → Feature Settings → Email Studio → Sender Profiles.
Create Your Sender Profile
Click ➕ "Create" and fill in these details:
Profile Name: Give your profile a name.
Sender Name: This is the name your customers will see.
Sender Email Address: The email address that appears as the sender.
Save it
Click 💾 "Save" to finish creating your Sender Profile.


Step 2: Configuring Send Classification
Find Send Classification
Go to ⚙️ Setup → 📂 Platform Tools → Feature Settings → Email Studio → Send Classification.
Create a Send Classification
Click ➕ "Create" and complete these fields:
🏷️ Classification Name: Choose a name for it.
🔑 External Key: A unique ID for the classification.
📜 CAN-SPAM Classification: Select transactional or commercial.
👤 Sender Profile: Choose the profile you just created.
Save it


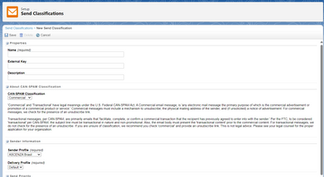
Click 💾 "Save" to finish.
Step 3: Create a Triggered Send Data Extension
Make a Data Extension
Go to ✉️ Email Studio and create a Data Extension.
Use the "TriggeredSendDataExtension" template.


Step 4: Design the Email Message
Design the email you want to use in your triggered send.
Customize it to fit your audience. 👩💻👨💻


Step 5: Configure a Triggered Send
Open Triggered Emails
Go to ✉️ Email Studio → Interactions → Triggered Emails.

Create and Set Up Triggered Send
Click ➕ "Create" and:
Name it and add an External Key.
Pick your Send Classification.
Link the Email Message and Triggered Send Data Extension.
Save it


Click 💾 "Save" and start your triggered send. 🚀
Step 6: Turn On Custom Reply Mail Management (RMM)
Enable Custom RMM
Go back to the 👤 Sender Profile and find 📩 Custom Reply Mail Management Settings. Check ✔️ "Use Custom Settings" below.

Set Up Reply Options
To match the 👤 Sender Profile, check ✔️ "Use direct forwards."
Or, enter a custom reply 👥 Name and 📧 Email Address.


Final Thoughts
Now you know how to set up "Custom Reply Mail Management" in Salesforce Marketing Cloud. This setup helps keep your ✉️ email replies organized and professional. Have tips or experiences with RMM? 🤔 Share them in the comments! 💬 Let’s learn from each other. Happy configuring! 🎊


Comments